0%

44:虚拟内存——C字符串与proc

看到一篇很好的实验性质的文章,在这里学习复现一下:破解虚拟内存

使用环境:

  • Ubuntu 24.04 noble(on the Windows Subsystem for Linux
  • gcc
  • python3.12.3

虚拟内存

首先我们需要明确虚拟内存是什么?

我们的内存在物理地址上实际上并不是连续的,为了方便程序的运行和对内存的使用,我们在使用虚拟内存技术。将物理内存映射到虚拟内存中,这个过程是通过内存管理单元(MMU)进行的。同时,在实际的运行过程中,我们并不希望进程之间互相影响,所以我们需要将它们的内存空间隔离开来,所以在进程眼中,他们都是独占内存的。

image.png

现在你应该大致可以理解,虚拟内存就是为了使应用程序免于管理共享内存、方便内存隔离而使用的一种技术。

接下来,我们可以开始我们的研究实验了,在此之前,我们需要明确以下几点:

  • 每个进程都有自己的虚拟内存
  • 虚拟内存的大小取决于你的计算机架构
  • 每个操作系统处理虚拟内存的方式并不一样,对于大多数现代操作系统而言吗,它们是这样的:
image.png

其中高地址存放了 命令行参数和环境变量栈空间 低地址存放了 可执行文件的部分内容

这个理解可能比较粗糙,之后再进一步进行理解。知道这些,我们的实验就可以开始进行了。

C程序

我们从一个简单的C程序开始:

1
2
3
4
5
6
7
8
9
10
11
12
13
14
15
16
17
18
19
20
21
22
23
24
#include<unistd.h>
#include<stdio.h>
#include<string.h>
#include<stdlib.h>

int main(){

char * s;
unsigned long int i;

s = strdup("Hello World!");
if(s==NULL){
fprintf(stderr,"Can't allocate mem with malloc");
return(EXIT_FAILURE);
}
printf("start:\n");
i = 0;
while(s){
printf("[%ld] %s (%p)\n",i,s,(void *)s);
sleep(1);
i++;
}
return(EXIT_SUCCESS);
}

我们注意到函数strdup,这个函数的原理是:

  • malloc一块内存空间
  • 将字符串复制过去
  • 返回该副本的地址

也就是说我们在,堆上创建了一个字符串,并返回了它的地址。运行效果如下:

1
2
3
4
5
6
7
8
9
10
11
12
13
14
15
16
17
18
19
20
$ ./loop
start:
[0] Hello World! (0x55f033fc82a0)
[1] Hello World! (0x55f033fc82a0)
[2] Hello World! (0x55f033fc82a0)
[3] Hello World! (0x55f033fc82a0)
[4] Hello World! (0x55f033fc82a0)
[5] Hello World! (0x55f033fc82a0)
[6] Hello World! (0x55f033fc82a0)
[7] Hello World! (0x55f033fc82a0)
[8] Hello World! (0x55f033fc82a0)
[9] Hello World! (0x55f033fc82a0)
[10] Hello World! (0x55f033fc82a0)
[11] Hello World! (0x55f033fc82a0)
[12] Hello World! (0x55f033fc82a0)
[13] Hello World! (0x55f033fc82a0)
[14] Hello World! (0x55f033fc82a0)
[15] Hello World! (0x55f033fc82a0)
[16] Hello World! (0x55f033fc82a0)
...

但是怎么证明地址0x55f033fc82a0是在堆上的呢?

我们需要使用我们的文件系统 /proc

文件系统

在linux的根目录下面,有一个目录叫做/proc,我们可以通过操作手册了解他的内容和作用,这里不过多讲述。我们查看/proc下的内容: image.png

我们注意到这些数字,它们是进程标识符(PID),我们可以通过ps aux显示PID对应的进程:

image.png

我们可以看到我们正在运行的C语言程序loop对应的PID是5390

我们回到/proc目录,进入loop对应的PID 的文件夹查看里面的内容

image.png

这里面的文件内容存储着当前进程的信息和内容,通过它们,我们可以深入了解这个进程,这里我们需要关注这两个文件:

  • /proc/[pid]/maps:进程的内存映射详情
  • /proc/[pid]/mem:进程的内存数据

我们可以看看loop进程的内存映射状态:

image.png

可以看到右边的字符串地址出现处于[heap]的地址范围中,所以这里验证了我们strdup确实在堆上创建的了一个字符串数组

现在,我们可以尝试覆写虚拟内存中的字符串了!

覆写字符串

首先我们需要以下信息:

  • 进程的PID
  • 字符串地址在堆上的偏移值
  • 要覆写的内容

然后可以写出参数处理部分:

1
2
3
4
5
6
7
8
9
int main(int argc,char *argv[]){
if(argc!=4){
printf("Usage: ... [pid] [offset](hex) [write]\n");
exit(EXIT_FAILURE);
}
pid = argv[1];
write2mem = argv[3];
offset = strtol(argv[2],NULL,16);
}

接着获取堆的首地址

1
2
3
4
5
6
7
8
9
10
11
12
13
14
15
16
17
18
19
20
21
22
23
int main(int argc,char *argv[]){
FILE * mpp;
...
sprintf(maps_filename,"/proc/%s/maps",pid);

char sd[20] = {'0','x'};
long int start_addr;
int j = 2;
mpp = fopen(maps_filename,"r");
/* while (fgets(buffer,sizeof(buffer),mpp) != NULL){
printf("%s",buffer);
}*/
for(int i=0;i<5;i++){
while((c=fgetc(mpp)) != '\n');
}
while((c=fgetc(mpp)) != '-'){
sd[j++] = c;
}
sd[j] = '\0';
start_addr = strtol(sd,NULL,16);
fclose(mpp);
...
}

然后利用偏移值和首地址计算出字符串的地址,从而实现字符串的覆写:

1
2
3
4
5
6
7
8
9
10
int main(int argc,char *argv[]){
FILE * mmp;
sprintf(mem_filename,"/proc/%s/mem",pid);
...
mmp = fopen(mem_filename,"rb+");
fseek(mmp,start_addr+offset,SEEK_SET);
fwrite(write2mem,sizeof(char),strlen(write2mem),mmp);
fclose(mmp);
...
}

完整的程序是:

1
2
3
4
5
6
7
8
9
10
11
12
13
14
15
16
17
18
19
20
21
22
23
24
25
26
27
28
29
30
31
32
33
34
35
36
37
38
39
40
41
42
43
44
45
46
47
48
49
50
51
52
53
54
55
56
57
58
59
#include<stdio.h>
#include<string.h>
#include<stdlib.h>

char *pid;
char *write2mem;
char mem_filename[20];
char maps_filename[20];
long offset;

void ret();

int main(int argc,char *argv[]){
FILE * mmp;
FILE * mpp;
char buffer[1024];
char c;

if(argc!=4){
ret();
}
pid = argv[1];
write2mem = argv[3];
offset = strtol(argv[2],NULL,16);

sprintf(maps_filename,"/proc/%s/maps",pid);
sprintf(mem_filename,"/proc/%s/mem",pid);

printf("[*] pid = %s\n[*] offset = %ld\n[*] write = %s\n",pid,offset,write2mem);
printf("[*] maps_filename = %s\n",maps_filename);
printf("[*] mem_filename = %s\n",mem_filename);

char sd[20] = {'0','x'};
long int start_addr;
int j = 2;
mpp = fopen(maps_filename,"r");
/* while (fgets(buffer,sizeof(buffer),mpp) != NULL){
printf("%s",buffer);
}*/
for(int i=0;i<5;i++){
while((c=fgetc(mpp)) != '\n');
}
while((c=fgetc(mpp)) != '-'){
sd[j++] = c;
}
sd[j] = '\0';
start_addr = strtol(sd,NULL,16);
fclose(mpp);

mmp = fopen(mem_filename,"rb+");
fseek(mmp,start_addr+offset,SEEK_SET);
fwrite(write2mem,sizeof(char),strlen(write2mem),mmp);
fclose(mmp);
}

void ret(){
printf("Usage: ... [pid] [offset](hex) [write]\n");
exit(EXIT_FAILURE);
}

我们可以运行以下看看效果

image.png

可以看到效果很成功。我们成功的修改了指定的内存

附录

这里提供一下作者用Python 写的一个覆写程序,更好用:

1
2
3
4
5
6
7
8
9
10
11
12
13
14
15
16
17
18
19
20
21
22
23
24
25
26
27
28
29
30
31
32
33
34
35
36
37
38
39
40
41
42
43
44
45
46
47
48
49
50
51
52
53
54
55
56
57
58
59
60
61
62
63
64
65
66
67
68
69
70
71
72
73
74
75
76
77
78
79
80
81
82
83
84
85
86
87
88
89
90
91
92
93
94
95
96
97
98
99
100
101
102
103
104
105
106
107
108
109
110
111
112
113
114
115
116
117
118
#!/usr/bin/env python3
'''
Locates and replaces the first occurrence of a string in the heap
of a process

Usage: ./read_write_heap.py PID search_string replace_by_string
Where:
- PID is the pid of the target process
- search_string is the ASCII string you are looking to overwrite
- replace_by_string is the ASCII string you want to replace
search_string with
'''

import sys

def print_usage_and_exit():
print('Usage: {} [pid] [search_string] [write_string]'.format(sys.argv[0]))
sys.exit(1)

# check usage
if len(sys.argv) != 4:
print_usage_and_exit()

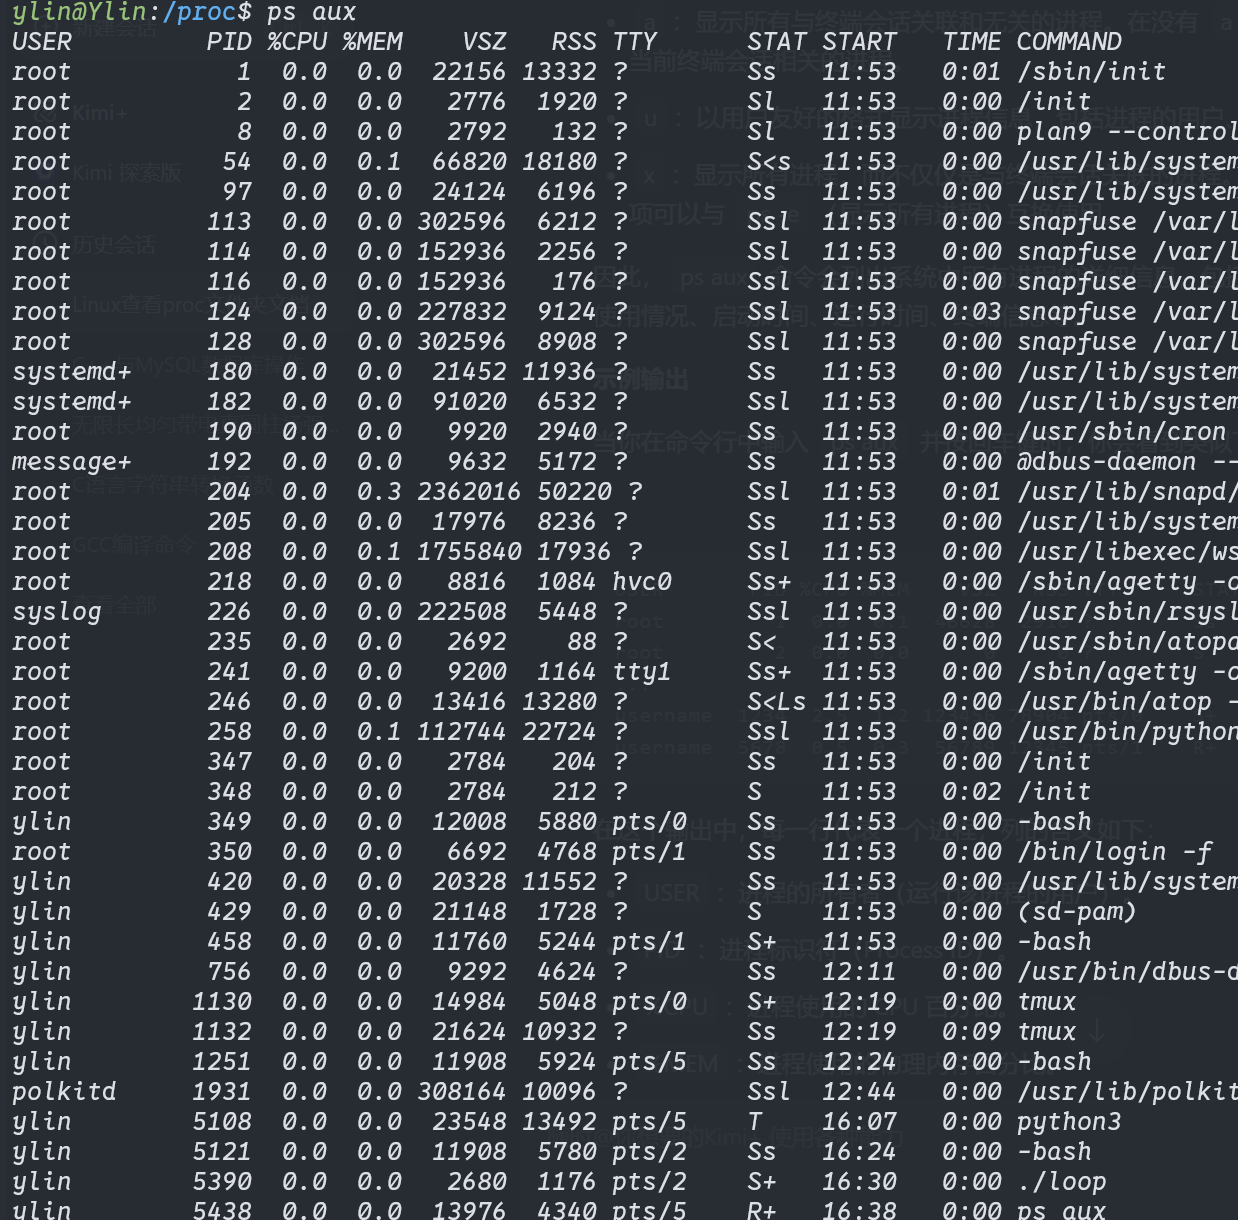
# get the pid from args
pid = int(sys.argv[1])
if pid <= 0:
print_usage_and_exit()
search_string = str(sys.argv[2])
if search_string == "":
print_usage_and_exit()
write_string = str(sys.argv[3])
if search_string == "":
print_usage_and_exit()

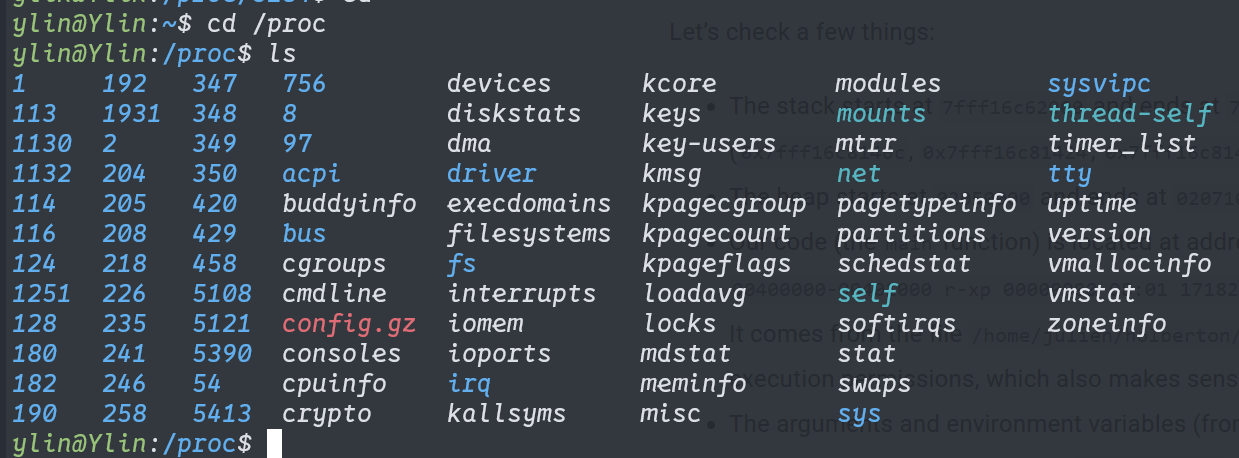
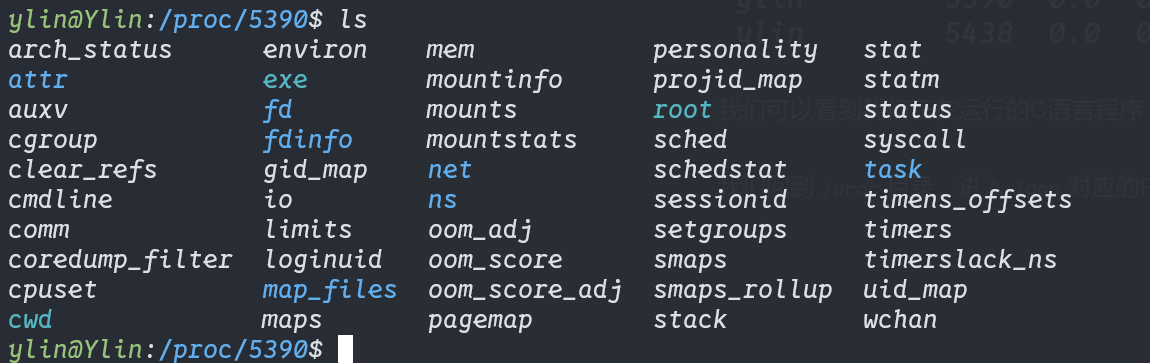
# open the maps and mem files of the process
maps_filename = "/proc/{}/maps".format(pid)
print("[*] maps: {}".format(maps_filename))
mem_filename = "/proc/{}/mem".format(pid)
print("[*] mem: {}".format(mem_filename))

# try opening the maps file
try:
maps_file = open('/proc/{}/maps'.format(pid), 'r')
except IOError as e:
print("[ERROR] Can not open file {}:".format(maps_filename))
print(" I/O error({}): {}".format(e.errno, e.strerror))
sys.exit(1)

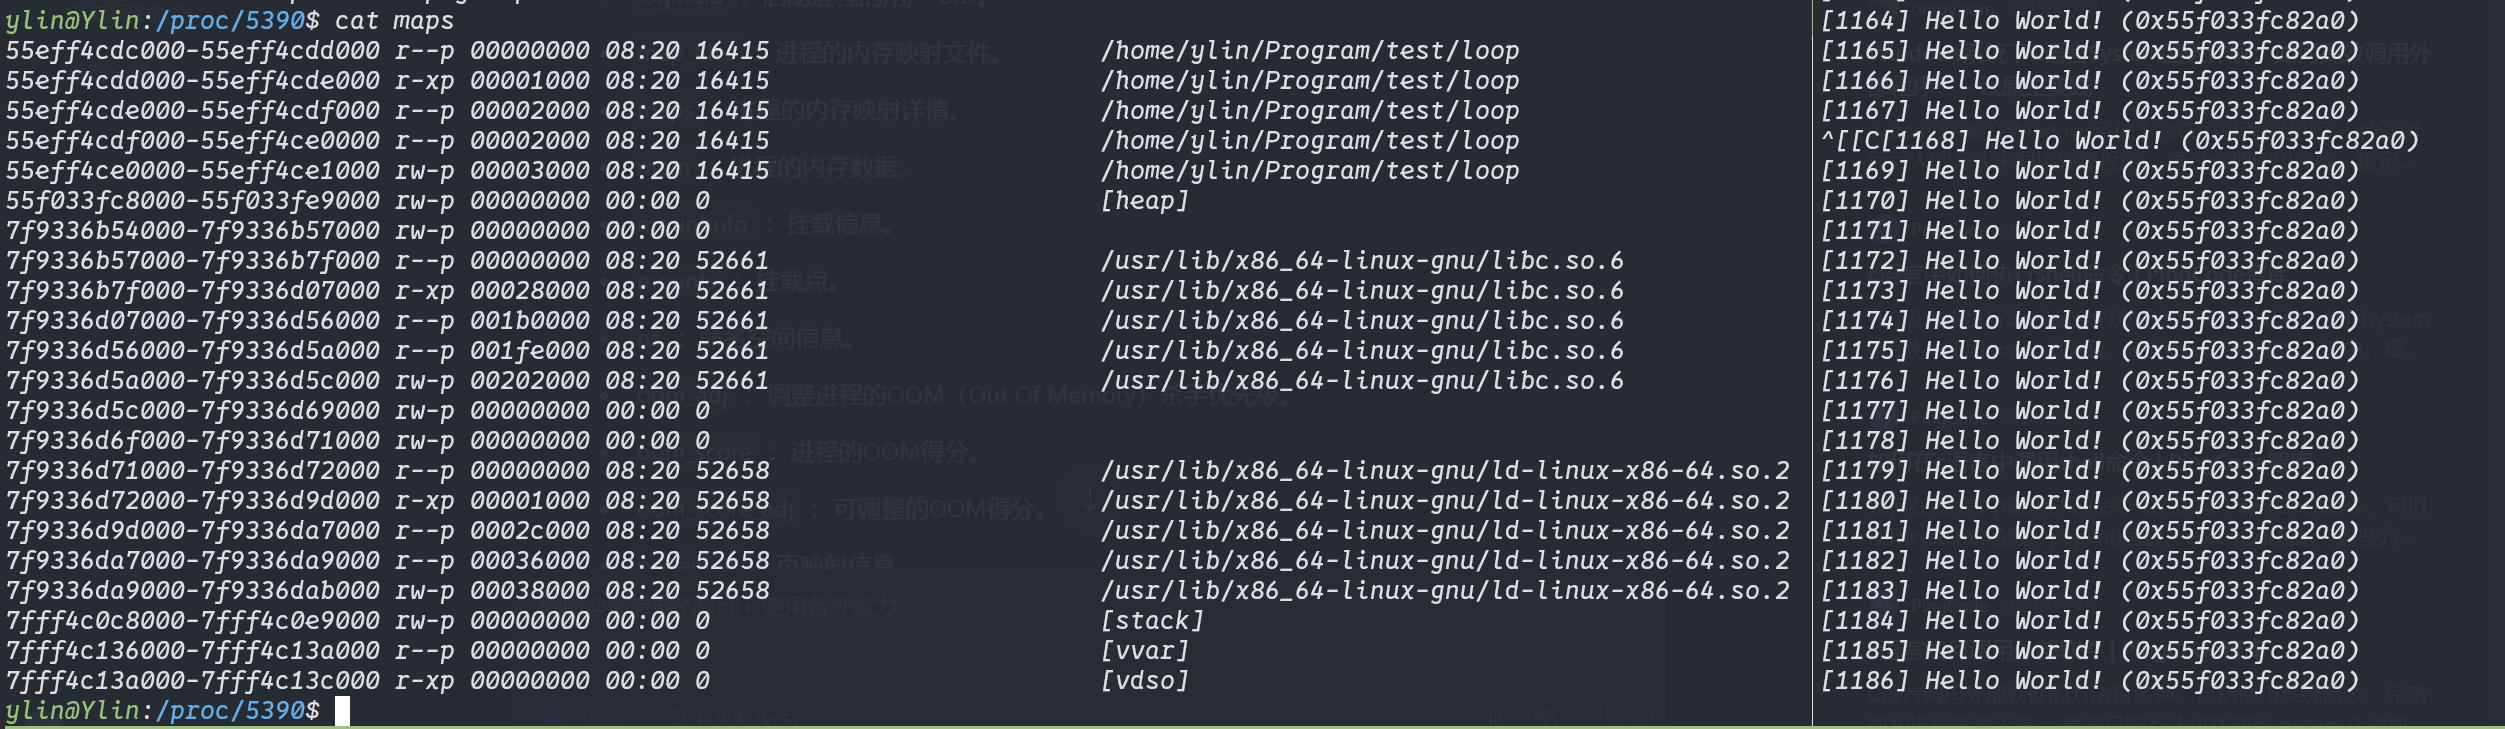
for line in maps_file:
sline = line.split(' ')
# check if we found the heap
if sline[-1][:-1] != "[heap]":
continue
print("[*] Found [heap]:")

# parse line
addr = sline[0]
perm = sline[1]
offset = sline[2]
device = sline[3]
inode = sline[4]
pathname = sline[-1][:-1]
print("\tpathname = {}".format(pathname))
print("\taddresses = {}".format(addr))
print("\tpermisions = {}".format(perm))
print("\toffset = {}".format(offset))
print("\tinode = {}".format(inode))

# check if there is read and write permission
if perm[0] != 'r' or perm[1] != 'w':
print("[*] {} does not have read/write permission".format(pathname))
maps_file.close()
exit(0)

# get start and end of the heap in the virtual memory
addr = addr.split("-")
if len(addr) != 2: # never trust anyone, not even your OS :)
print("[*] Wrong addr format")
maps_file.close()
exit(1)
addr_start = int(addr[0], 16)
addr_end = int(addr[1], 16)
print("\tAddr start [{:x}] | end [{:x}]".format(addr_start, addr_end))

# open and read mem
try:
mem_file = open(mem_filename, 'rb+')
except IOError as e:
print("[ERROR] Can not open file {}:".format(mem_filename))
print(" I/O error({}): {}".format(e.errno, e.strerror))
maps_file.close()
exit(1)

# read heap
mem_file.seek(addr_start)
heap = mem_file.read(addr_end - addr_start)

# find string
try:
i = heap.index(bytes(search_string, "ASCII"))
except Exception:
print("Can't find '{}'".format(search_string))
maps_file.close()
mem_file.close()
exit(0)
print("[*] Found '{}' at {:x}".format(search_string, i))

# write the new string
print("[*] Writing '{}' at {:x}".format(write_string, addr_start + i))
mem_file.seek(addr_start + i)
mem_file.write(bytes(write_string, "ASCII"))

# close files
maps_file.close()
mem_file.close()

# there is only one heap in our example
break