继续图形学的学习,我打算在下一周左右结束图形学的学习,因为要期中考试了(晕),现在赶赶进度
金属
一个材质的抽象类
如果想让不同的物体拥有不同的材质,我们可以设置一个通用的材质类,具有许多参数。或者我们可以有一个抽象的材质类,封装特定材质的独特行为,这里我们使用第二种方式,因为这样便于我们更好的组织代码,设置这么一个类,对于不同的材质,我们需要做两件事:
产生一个散射光线(或者吸收入射光线)
如果散射了,光线应该怎么衰减
在此基础之上,我们可以定义出我们的抽象类:
1 2 3 4 5 6 7 8 9 10 11 12 13 14 15 #ifndef RENDER_C___MATERIAL_H #define RENDER_C___MATERIAL_H #include "hittable.h" class material {public : virtual ~material () = default ; virtual bool scatter (const ray& r_in,hit_record& rec,color& attenuation, ray& scattered) const return false ; } }; #endif
描述光线-物体交点的数据结构
hit_record的设置目的是为了避免一大堆的参数,所以我们设置一个封装的类型,将信息参数放入其中。当然,由于hittable.h和materials.h需要在代码中能够引用对方的类,为了避免他们的循环依赖,我们向hittable文件头中添加class material来指定类的指针。
1
2
3
4
5
6
7
8
9
10
11
12
13
14
15
16
class material ;class hit_record {public : point3 p; vec3 normal; shared_ptr<material> mat; double t; bool front_face; void set_face_normal (const ray& r,const vec3& outward_normal) front_face = dot (r.direction (),outward_normal) < 0 ; normal = front_face ? outward_normal : -outward_normal; } };
hit_record将一堆参数放入类中,然后作为一个组合发送。当光线击中一个表面是,hit_record中的材料指针被设置为球体在main中给定的指针材料。且当ray_color()获取hit_record时,它可以调用材料指针的成员函数来找出散射(如果有的话)
现在我们需要设置球体sphere类:
1
2
3
4
5
6
7
8
9
10
11
12
13
14
15
16
17
18
19
20
21
22
23
24
25
26
27
28
29
30
31
32
33
34
35
36
37
38
39
40
class sphere : public hittable{public : sphere (const point3& center, double radius) : center (center), radius (std::fmax (0 ,radius)) { } bool hit (const ray& r,interval ray_t ,hit_record& rec) const override vec3 oc = center - r.origin (); auto a = r.direction ().length_squared (); auto h = dot (r.direction (),oc); auto c = oc.length_squared () - radius*radius; auto discriminant = h*h - a*c; if (discriminant < 0.0 ){ return false ; } auto sqrtd = std::sqrt (discriminant); auto root = (h - sqrtd) / a; if (!ray_t .surrounds (root)){ root = (h + sqrtd) / a; if (!ray_t .surrounds (root)) return false ; } rec.t = root; rec.p = r.at (rec.t); vec3 outward_normal = (rec.p - center) / radius; rec.set_face_normal (r,outward_normal); rec.mat = mat; return true ; } private : point3 center; double radius; shared_ptr<material> mat; };
光线散射与反射率的建模
反射率是我们接下来需要关注的一件事情,反射率和材质
颜色有关,也会随入射光线方向变化
而我们先前的Lambertian 反射,它的反射有三种情况:
根据反射率R,总是散射光线并衰减光线。
光线有(1-R)的概率散射后不衰减
综上两个情况
这里为了程序的简易性,我们选择第一种情况,来实现我们的Lambertian
材料:
1
2
3
4
5
6
7
8
9
10
11
12
13
class lambertian : public material{public : lambertian (const color& albedo) : albedo (albedo) {} bool scatter (const ray& r_in,hit_record& rec,color& attenuation, ray& scattered) const override auto scatter_direction = rec.normal + random_unit_vector (); scattered = ray (rec.p,scatter_direction); attenuation = albedo; return true ; } private : color albedo; };
如果你仔细阅读会发现,我们使用的是random_unit_vector来生成一个随机的向量,这个向量可能和法线是等大反向的,从而导致零散射方向向量的情况,导致后许发生各种不良的情况。所以我们需要拦截这种可能性
所以我们创建一个新的向量方法——该方法返回一个布尔值,判断各个方向的维度会不会趋近0:
1
2
3
4
5
bool near_zero () const auto s = 1e-8 ; return (std::fabs (e[0 ]) < s) && (std::fabs (e[1 ]) < s) && (std::fabs (e[2 ]) < s); }
然后更新我们的Lambertian反射:
1
2
3
4
5
6
7
8
9
10
11
bool scatter (const ray& r_in,hit_record& rec,color& attenuation, ray& scattered) const override auto scatter_direction = rec.normal + random_unit_vector (); if (scatter_direction.near_zero ()) scatter_direction = rec.normal; scattered = ray (rec.p,scatter_direction); attenuation = albedo; return true ; }
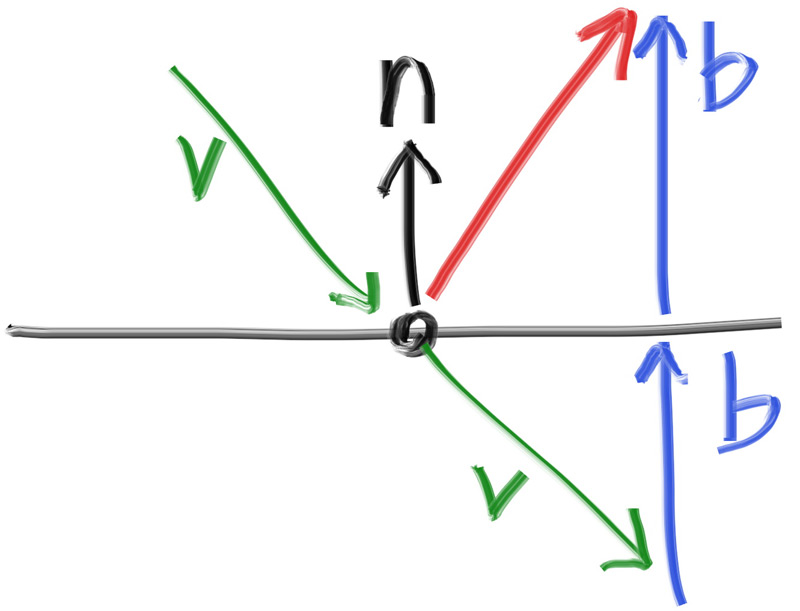
镜像反射
对于抛光的金属,光线不会随机的散射,而是对称的反射:
image.png
这个过程我们可以用向量来实现计算:
首先我们计算出向量v在n上的投影长度,然后取相反数得到b
然后通过v+2b,来计算出反射后的光线
我们可以写出一下程序来计算反射函数:
1 2 3 4 5 inline vec3 reflect (const vec3& v, const vec3& n) return v - 2 * dot (v,n)*n; }
然后我们用这个函数实现我们的金属材质:
1
2
3
4
5
6
7
8
9
10
11
12
13
class metal : public material{public : metal (const color& albedo) : albedo (albedo){} bool scatter (const ray& r_in,hit_record& rec,color& attenuation, ray& scattered) const override vec3 reflected = reflect (r_in.direction (),rec.normal); scattered = ray (rec.p,reflected); attenuation = albedo; return true ; } private : color albedo; };
我们接下来修改ray_color()函数以应用更改:
1
2
3
4
5
6
7
8
9
10
11
12
13
14
15
16
17
18
19
color ray_color (const ray& r,int depth, const hittable& world) const { if (depth <= 0 ) return {0 ,0 ,0 }; hit_record rec; if (world.hit (r, interval (0.001 , infinity), rec)) { ray scattered; color attenuation; if (rec.mat->scatter (r,rec,attenuation,scattered)) return attenuation* ray_color (scattered,depth-1 ,world); return {0 ,0 ,0 }; } vec3 unit_direction = unit_vector (r.direction ()); auto a = 0.5 *(unit_direction.y () + 1.0 ); return (1.0 -a)*color (1.0 , 1.0 , 1.0 ) + a*color (0.5 , 0.7 , 1.0 ); }
然后接着更行sphere的构造函数以初始化材质指针mat:
1
2
3
4
5
class sphere : public hittable { public : sphere (const point3& center, double radius, shared_ptr<material> mat) : center (center), radius (std::fmax (0 ,radius)), mat (mat) {} ... };
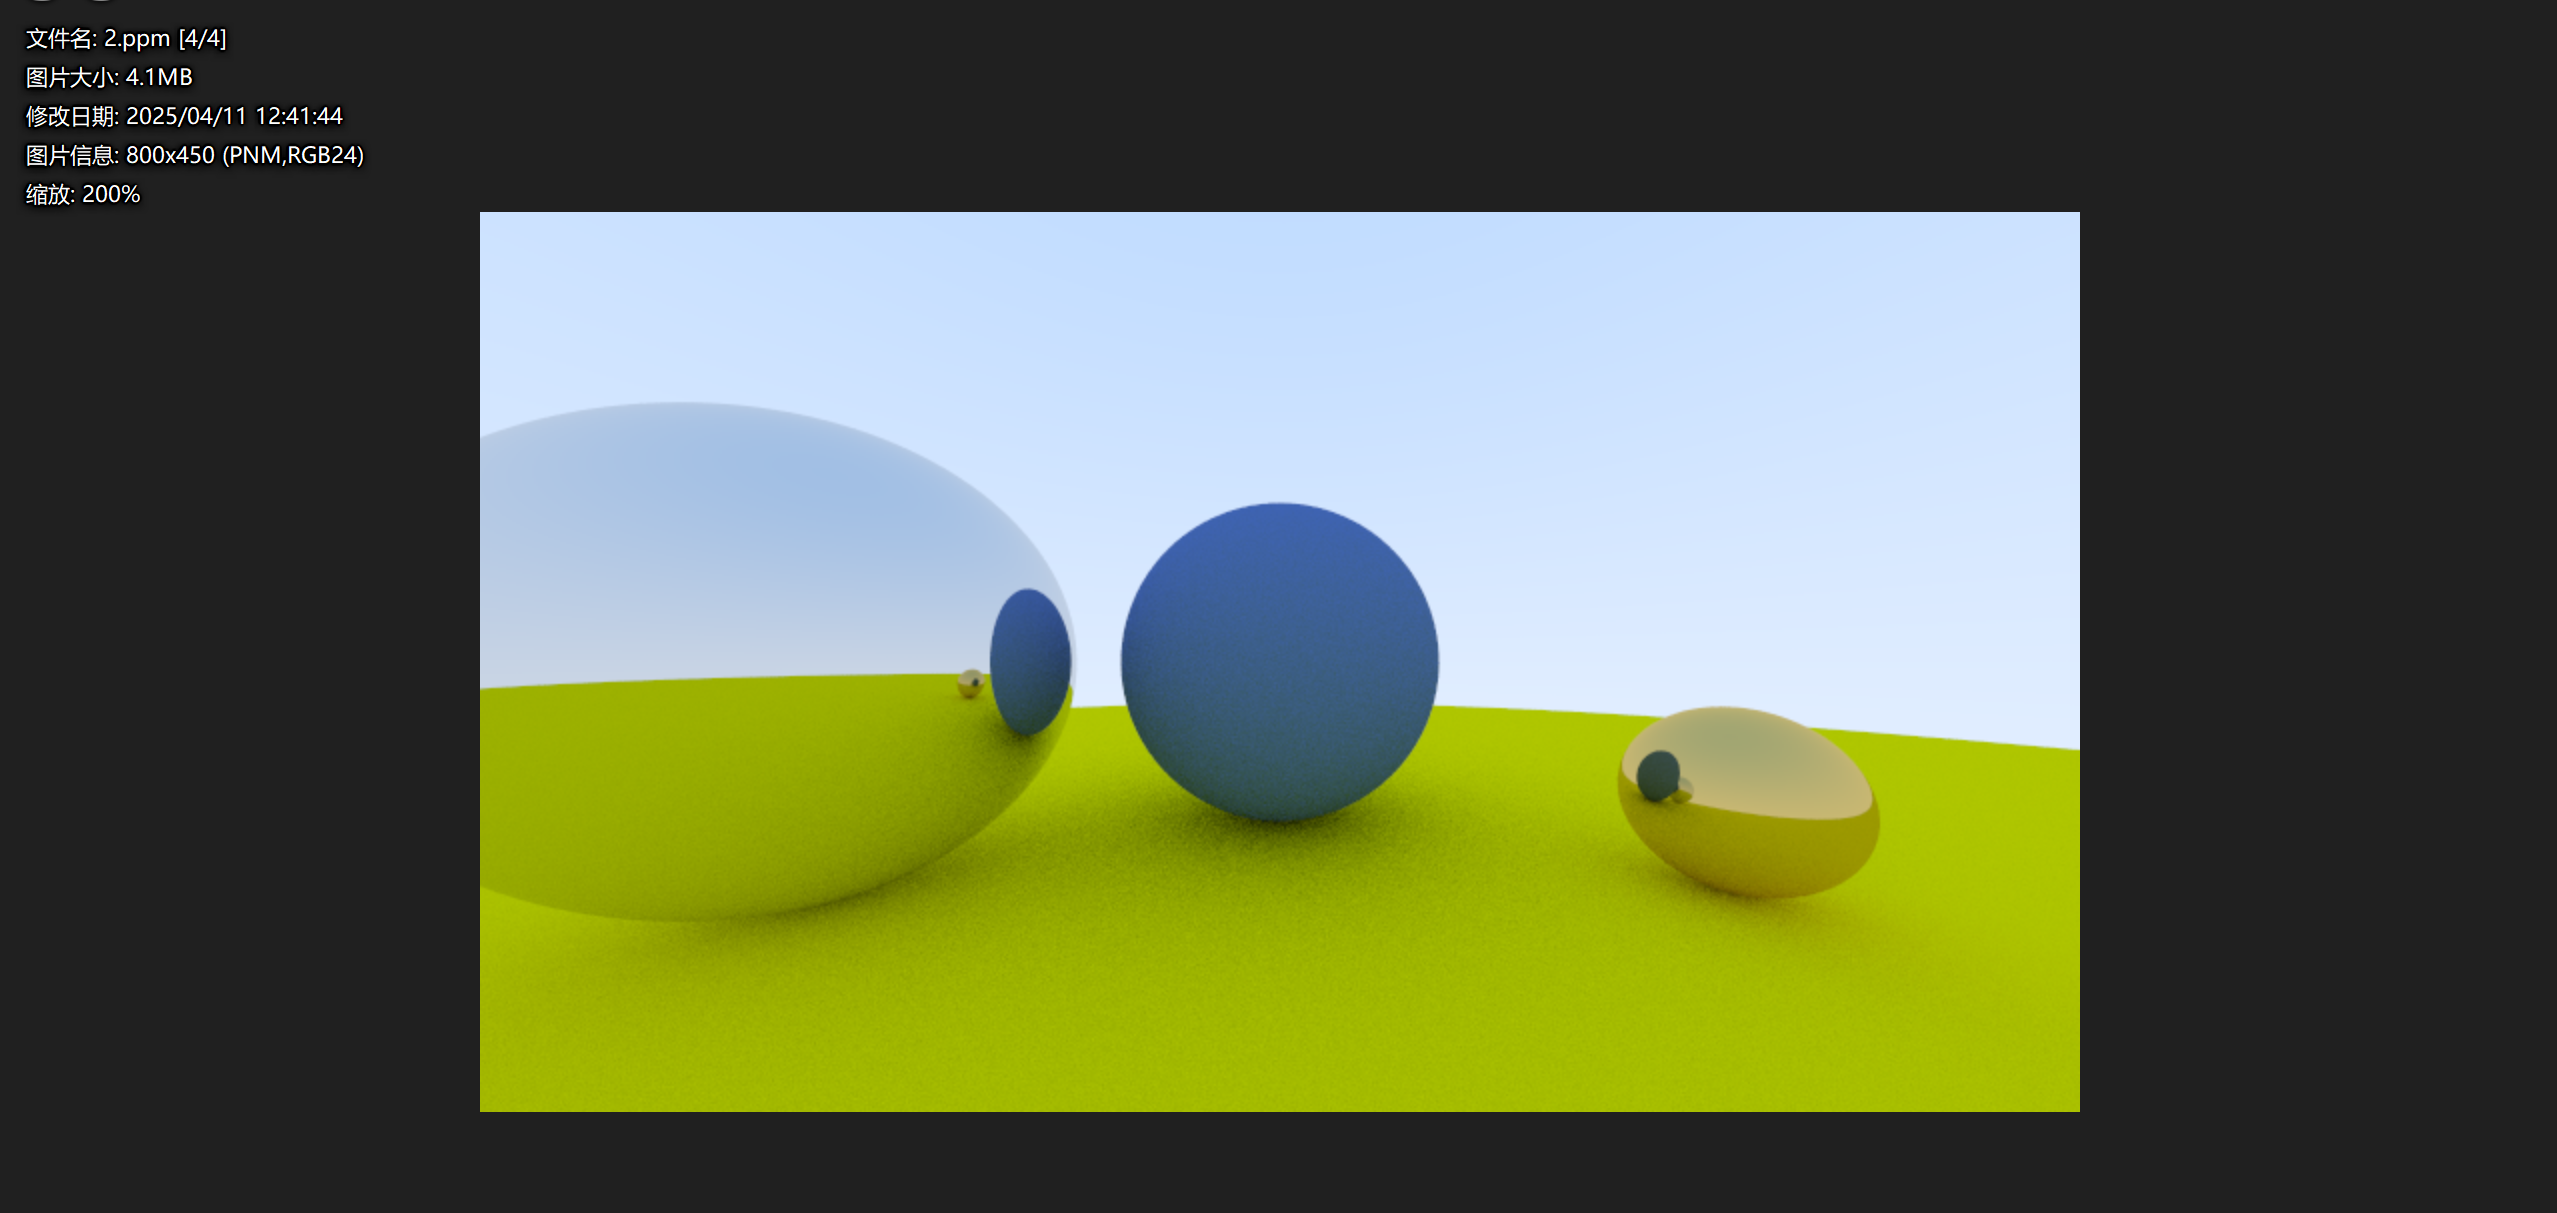
金属球体在场景中
现在我们向场景中添加我们的金属球体
1
2
3
4
5
6
7
8
9
10
11
12
13
14
15
int main () hittable_list world; auto material_ground = make_shared <lambertian>(color (0.8 , 0.8 , 0.0 )); auto material_center = make_shared <lambertian>(color (0.1 , 0.2 , 0.5 )); auto material_left = make_shared <metal>(color (0.8 , 0.8 , 0.8 )); auto material_right = make_shared <metal>(color (0.8 , 0.6 , 0.2 )); world.add (make_shared <sphere>(point3 ( 0.0 , -100.5 , -1.0 ), 100.0 , material_ground)); world.add (make_shared <sphere>(point3 ( 0.0 , 0.0 , -1.5 ), 0.5 , material_center)); world.add (make_shared <sphere>(point3 (-1.0 , 0.0 , -1.0 ), 0.5 , material_left)); world.add (make_shared <sphere>(point3 ( 1.0 , -0.3 , -1.0 ), 0.2 , material_right)); ... cam.render (world); }
成功渲染了出来,看:
image.png
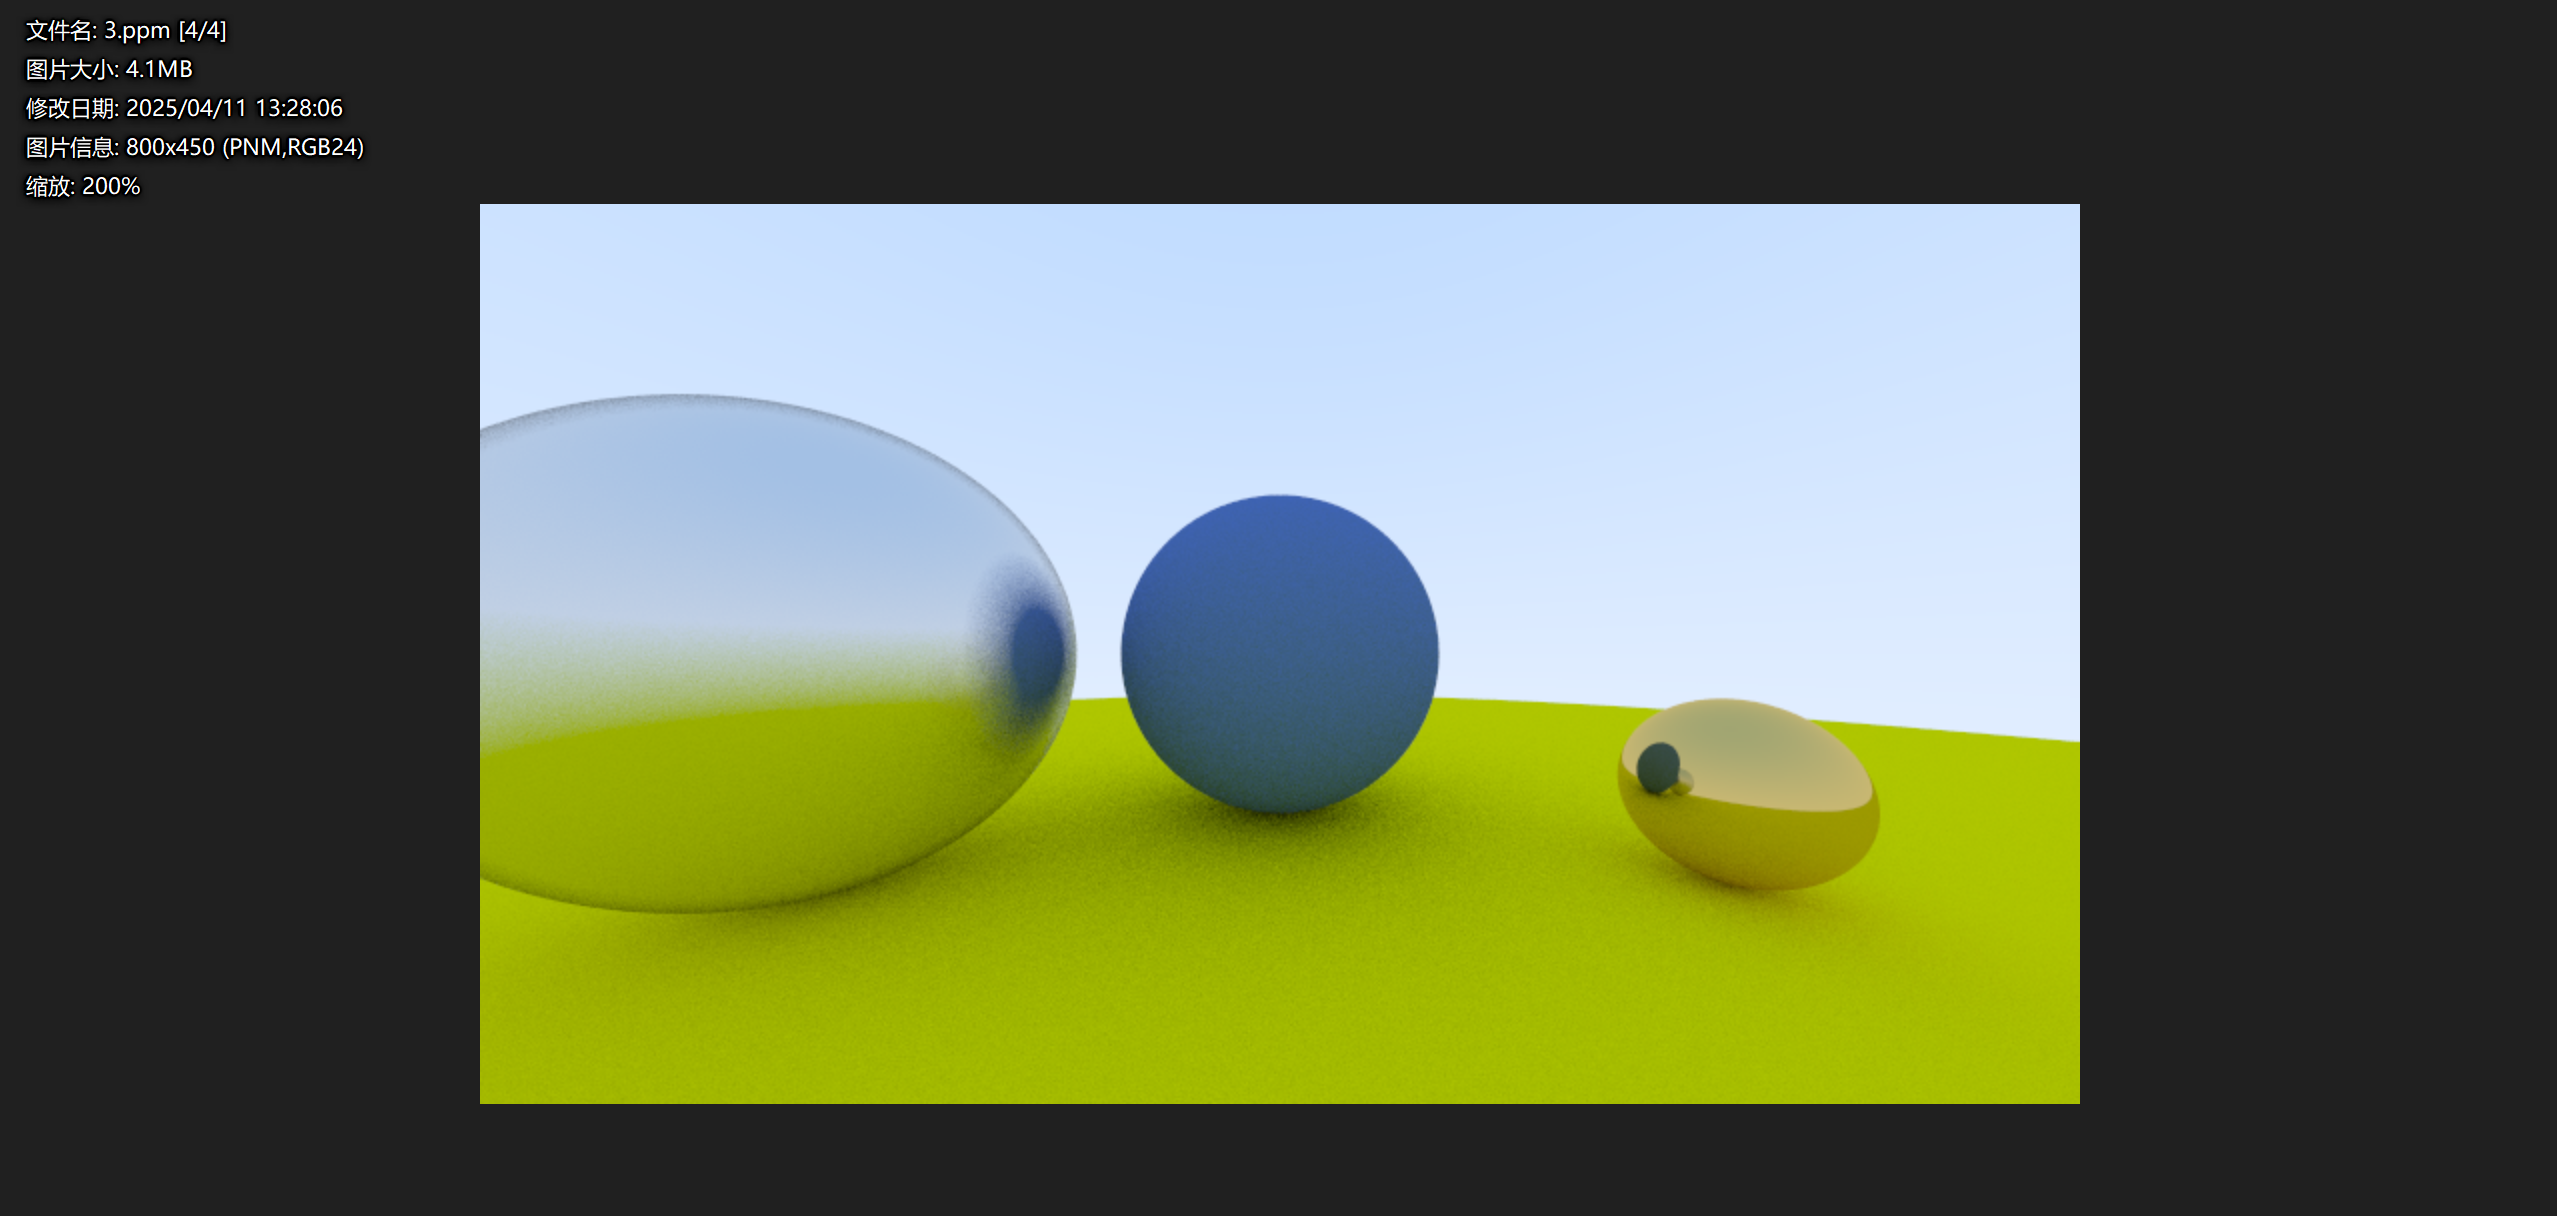
模糊反射
我们的金属球体太过完美,但是现实中我们往往也会看到各种磨砂材质的金属,所以在这里我们要引入一个新的变量fuzz,来随机化反射方向。我们使用一个随机点,以原始起点为中心,来模糊反射的光线。
image.png
我们用fuzz来决定模糊球体的大小,模糊球体越大,反射效果就越明显。当模糊球体较大或光线几乎平行于表面时(称为掠射光线),计算出的反射光线可能会指向物体内部,即在物体表面下方。对于这种情况,可以选择简单地吸收这些光线,即认为它们没有从物体表面反射出去。
为了确保模糊球体相对于反射光线的尺度是一致的,需要对反射光线进行归一化处理,即调整其长度为1。这样做可以确保无论反射光线的长度如何变化,模糊球体的尺度都是相对于光线方向的,而不是其长度。
于是我们可以更改以下程序以实现这个功能:
1
2
3
4
5
6
7
8
9
10
11
12
13
14
15
class metal : public material{public : metal (const color& albedo) : albedo (albedo){} bool scatter (const ray& r_in,hit_record& rec,color& attenuation, ray& scattered) const override vec3 reflected = reflect (r_in.direction (),rec.normal); reflected = unit_vector (reflected) + (fuzz*random_unit_vector ()); scattered = ray (rec.p,reflected); attenuation = albedo; return (dot (scattered.direction (),rec.normal) > 0 ); } private : color albedo; double fuzz; };
然后调整一下我们的main函数:
1
2
3
4
5
6
7
8
int main () ... world.add (make_shared <sphere>(point3 ( 0.0 , -100.5 , -1.0 ), 100.0 , material_ground)); world.add (make_shared <sphere>(point3 ( 0.0 , 0.0 , -1.5 ), 0.5 , material_center)); world.add (make_shared <sphere>(point3 (-1.0 , 0.0 , -1.0 ), 0.5 , material_left)); world.add (make_shared <sphere>(point3 ( 1.0 , -0.3 , -1.0 ), 0.2 , material_right)); ... }
渲染出来的是这样的:
image.png
可以看到左边有明显的模糊感